Introduction
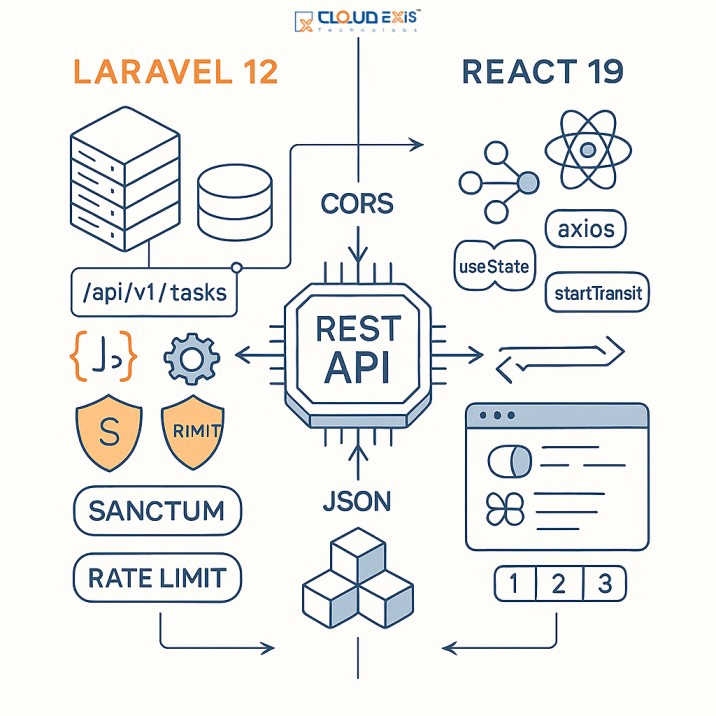
When you’re building a modern web app, one thing is clear: the backend and frontend have to talk seamlessly. It’s like a kitchen and dining hall:
Laravel (backend) is the chef preparing data.
React (frontend) is the waiter delivering it beautifully to users.
In this guide, we’ll build a RESTful API using Laravel 12 and connect it with React 19. You’ll get hands-on steps (setup, code, best practices) and understand why we pick these versions.
Let’s roll up our sleeves.
Why Laravel 12 + React 19?
You might ask: “Why not Laravel 11 or React 18?” Good question. Here’s what makes 12 & 19 attractive:
Laravel 12
Released on February 24, 2025
It focuses on maintenance, minimal breaking changes, and updating dependencies.
It introduces new starter kits for React, Vue, and Livewire (using Inertia, shadcn UI, TypeScript, etc.).
It continues support for PHP 8.2 – 8.4 and has an extended window for bug fixes & security fixes.
So using Laravel 12 means you’re future-proof, getting the latest defaults, and not stuck in old patterns.
React 19
React v19 became stable on December 5, 2024
It adds Actions, a powerful new paradigm for async state updates (you can pass async functions to transitions).
New hooks and APIs:
useActionState,useFormStatus,useOptimistic,useetc.Many experimental features from React 18 are now stabilized in 19.
So React 19 gives you a cleaner, more expressive way to handle async UI transitions and state.
In short: Laravel 12 + React 19 means you’re on bleeding edge, stable, modern defaults.
Step 1: Set Up Laravel 12
First, create the project using Laravel 12:composer create-project laravel/laravel:^12.0 laravel-api
cd laravel-api
Configure Database
In .env:
DB_CONNECTION=mysql
DB_HOST=127.0.0.1
DB_DATABASE=react_api
DB_USERNAME=root
DB_PASSWORD=
Then run:
php artisan migrate
Your Laravel 12 backend is alive.
Step 2: Plan the API
Let’s build a simple Task Manager API with CRUD:
Create a task
Get tasks
Update a task
Delete a task
That aligns perfectly with REST principles.
Step 3: Model & Migration
Generate:
php artisan make:model Task -m
In the migration file:
public function up()
{
Schema::create(‘tasks’, function (Blueprint $table) {
$table->id();
$table->string(‘title’);
$table->text(‘description’)->nullable();
$table->boolean(‘is_completed’)->default(false);
$table->timestamps();
});
}
Then:
Step 4: Resource Controller
Generate:
php artisan make:controller TaskController –resource
TaskController.php:namespace App\Http\Controllers;
use App\Models\Task;
use Illuminate\Http\Request;
class TaskController extends Controller
{
public function index()
{
return response()->json(Task::all(), 200);
}
public function store(Request $request)
{
$request->validate([
‘title’ => ‘required|string|max:255’
]);
$task = Task::create($request->all());
return response()->json($task, 201);
}
public function show(Task $task)
{
return response()->json($task, 200);
}
public function update(Request $request, Task $task)
{
$task->update($request->all());
return response()->json($task, 200);
}
public function destroy(Task $task)
{
$task->delete();
return response()->json(null, 204);
}
}
We validate inputs so garbage doesn’t sneak in.
Step 5: API Routes
In routes/api.php:
use App\Http\Controllers\TaskController;
Route::apiResource(‘tasks’, TaskController::class);
Laravel wires:
GET /api/tasksPOST /api/tasksPUT /api/tasks/{id}DELETE /api/tasks/{id}
Step 6: Test via Postman
Use Postman or Insomnia to verify:
POST /api/tasks→ createGET /api/tasks→ listPUT /api/tasks/{id}→ updateDELETE /api/tasks/{id}→ delete
Once that’s working, you’re good to move to the frontend.
Step 7: Set Up React 19
Create the frontend project:
npm init react-app react-frontend
cd react-frontend
npm install react@19 react-dom@19
npm start
Or using a more modern tool (Vite, etc.) ensure React 19 is your installed version.
Install Axios:
npm install axios
Step 8: API Service Layer
In src/services/taskService.js:
import axios from ‘axios’;
const API_URL = “http://127.0.0.1:8000/api/tasks”;
export const getTasks = () => axios.get(API_URL);
export const createTask = (task) => axios.post(API_URL, task);
export const updateTask = (id, task) => axios.put(`${API_URL}/${id}`, task);
export const deleteTask = (id) => axios.delete(`${API_URL}/${id}`);
This keeps calls organized and your components clean.
Step 9: Build React UI with React 19 Features
Here’s a sample component using React 19 patterns:
import React, { useEffect, useState, startTransition } from ‘react’;
import { getTasks, createTask, updateTask, deleteTask } from ‘./services/taskService’;
function TaskApp() {
const [tasks, setTasks] = useState([]);
const [title, setTitle] = useState(“”);
useEffect(() => {
loadTasks();
}, []);
const loadTasks = () => {
getTasks().then(res => setTasks(res.data));
};
const handleAdd = () => {
if (!title.trim()) return;
// Use React 19’s transition
startTransition(async () => {
await createTask({ title });
await loadTasks();
setTitle(“”);
});
};
const handleToggle = (task) => {
startTransition(async () => {
await updateTask(task.id, { …task, is_completed: !task.is_completed });
loadTasks();
});
};
const handleDelete = (id) => {
startTransition(async () => {
await deleteTask(id);
loadTasks();
});
};
return (
<div>
<h1>Task Manager (React 19)</h1>
<input
value={title}
onChange={(e) => setTitle(e.target.value)}
placeholder=”Enter a task”
/>
<button onClick={handleAdd}>Add</button>
<ul>
{tasks.map(task => (
<li key={task.id}>
{task.title} — {task.is_completed ? “Done” : “🕓 Pending”}
<button onClick={() => handleToggle(task)}>Toggle</button>
<button onClick={() => handleDelete(task.id)}>Delete</button>
</li>
))}
</ul>
</div>
);
}
export default TaskApp;
Notice we wrap async operations in startTransition (a React 19/18 concept) for smoother UI updates.
Later, you can incorporate new hooks such as useActionState, useOptimistic, useFormStatus, etc., for more advanced patterns.
Step 10: Handle CORS
Since frontend (React 19) and backend (Laravel 12) might run on different ports, configure CORS.
Install the package:
composer require fruitcake/laravel-cors
In config/cors.php, allow React’s origin (e.g. http://localhost:3000).
Step 11: Secure Your API
Security is key. Consider:
Authentication: Use Laravel Sanctum or the new starter kit features in Laravel 12 (React starter kit supports auth out of the box).
Validation: Already used in store. Also validate in update.
Rate Limiting: Throttle to prevent abuse.
Error Handling: Return consistent JSON errors with HTTP status codes.
Step 12: Best Practices
Use Laravel API Resources to format JSON.
Version your API (e.g.
/api/v1/tasks) so future changes don’t break older clients.Paginate when the dataset grows.
Logging/Monitoring: Use Laravel Telescope (or similar) for API visibility.
Use the new starter kit in Laravel 12 for React + auth boilerplate to avoid rewriting basic plumbing.
Step 13: Deployment
Frontend (React 19): Deploy to Vercel, Netlify, or any static host.
Backend (Laravel 12): Deploy to Forge, a VPS, or platforms like Heroku.
Database: Use managed DB (RDS, etc.).
Keep
.envsafe and out of version control.
Real-World Use Cases
SaaS apps where React 19’s transitions simplify form-heavy UIs.
Dashboards with real-time updates.
E-commerce: Laravel 12 handles APIs for products/orders, React 19 handles cart, UI transitions, etc.
Conclusion
Using Laravel 12 + React 19 lets you start with the most current, stable versions available. You get:
Laravel 12’s refined defaults, starter kits, modern dependency updates.
React 19’s new APIs and better async UI handling.
In this guide, you:
Set up Laravel 12 and built REST APIs.
Tested endpoints in Postman.
Set up React 19 and consumed the APIs.
Handled CORS, validation, and security.
Touched on performance & best practices.
This stack isn’t just for toy projects. it’s a strong foundation for real-world, production apps. Contact Us